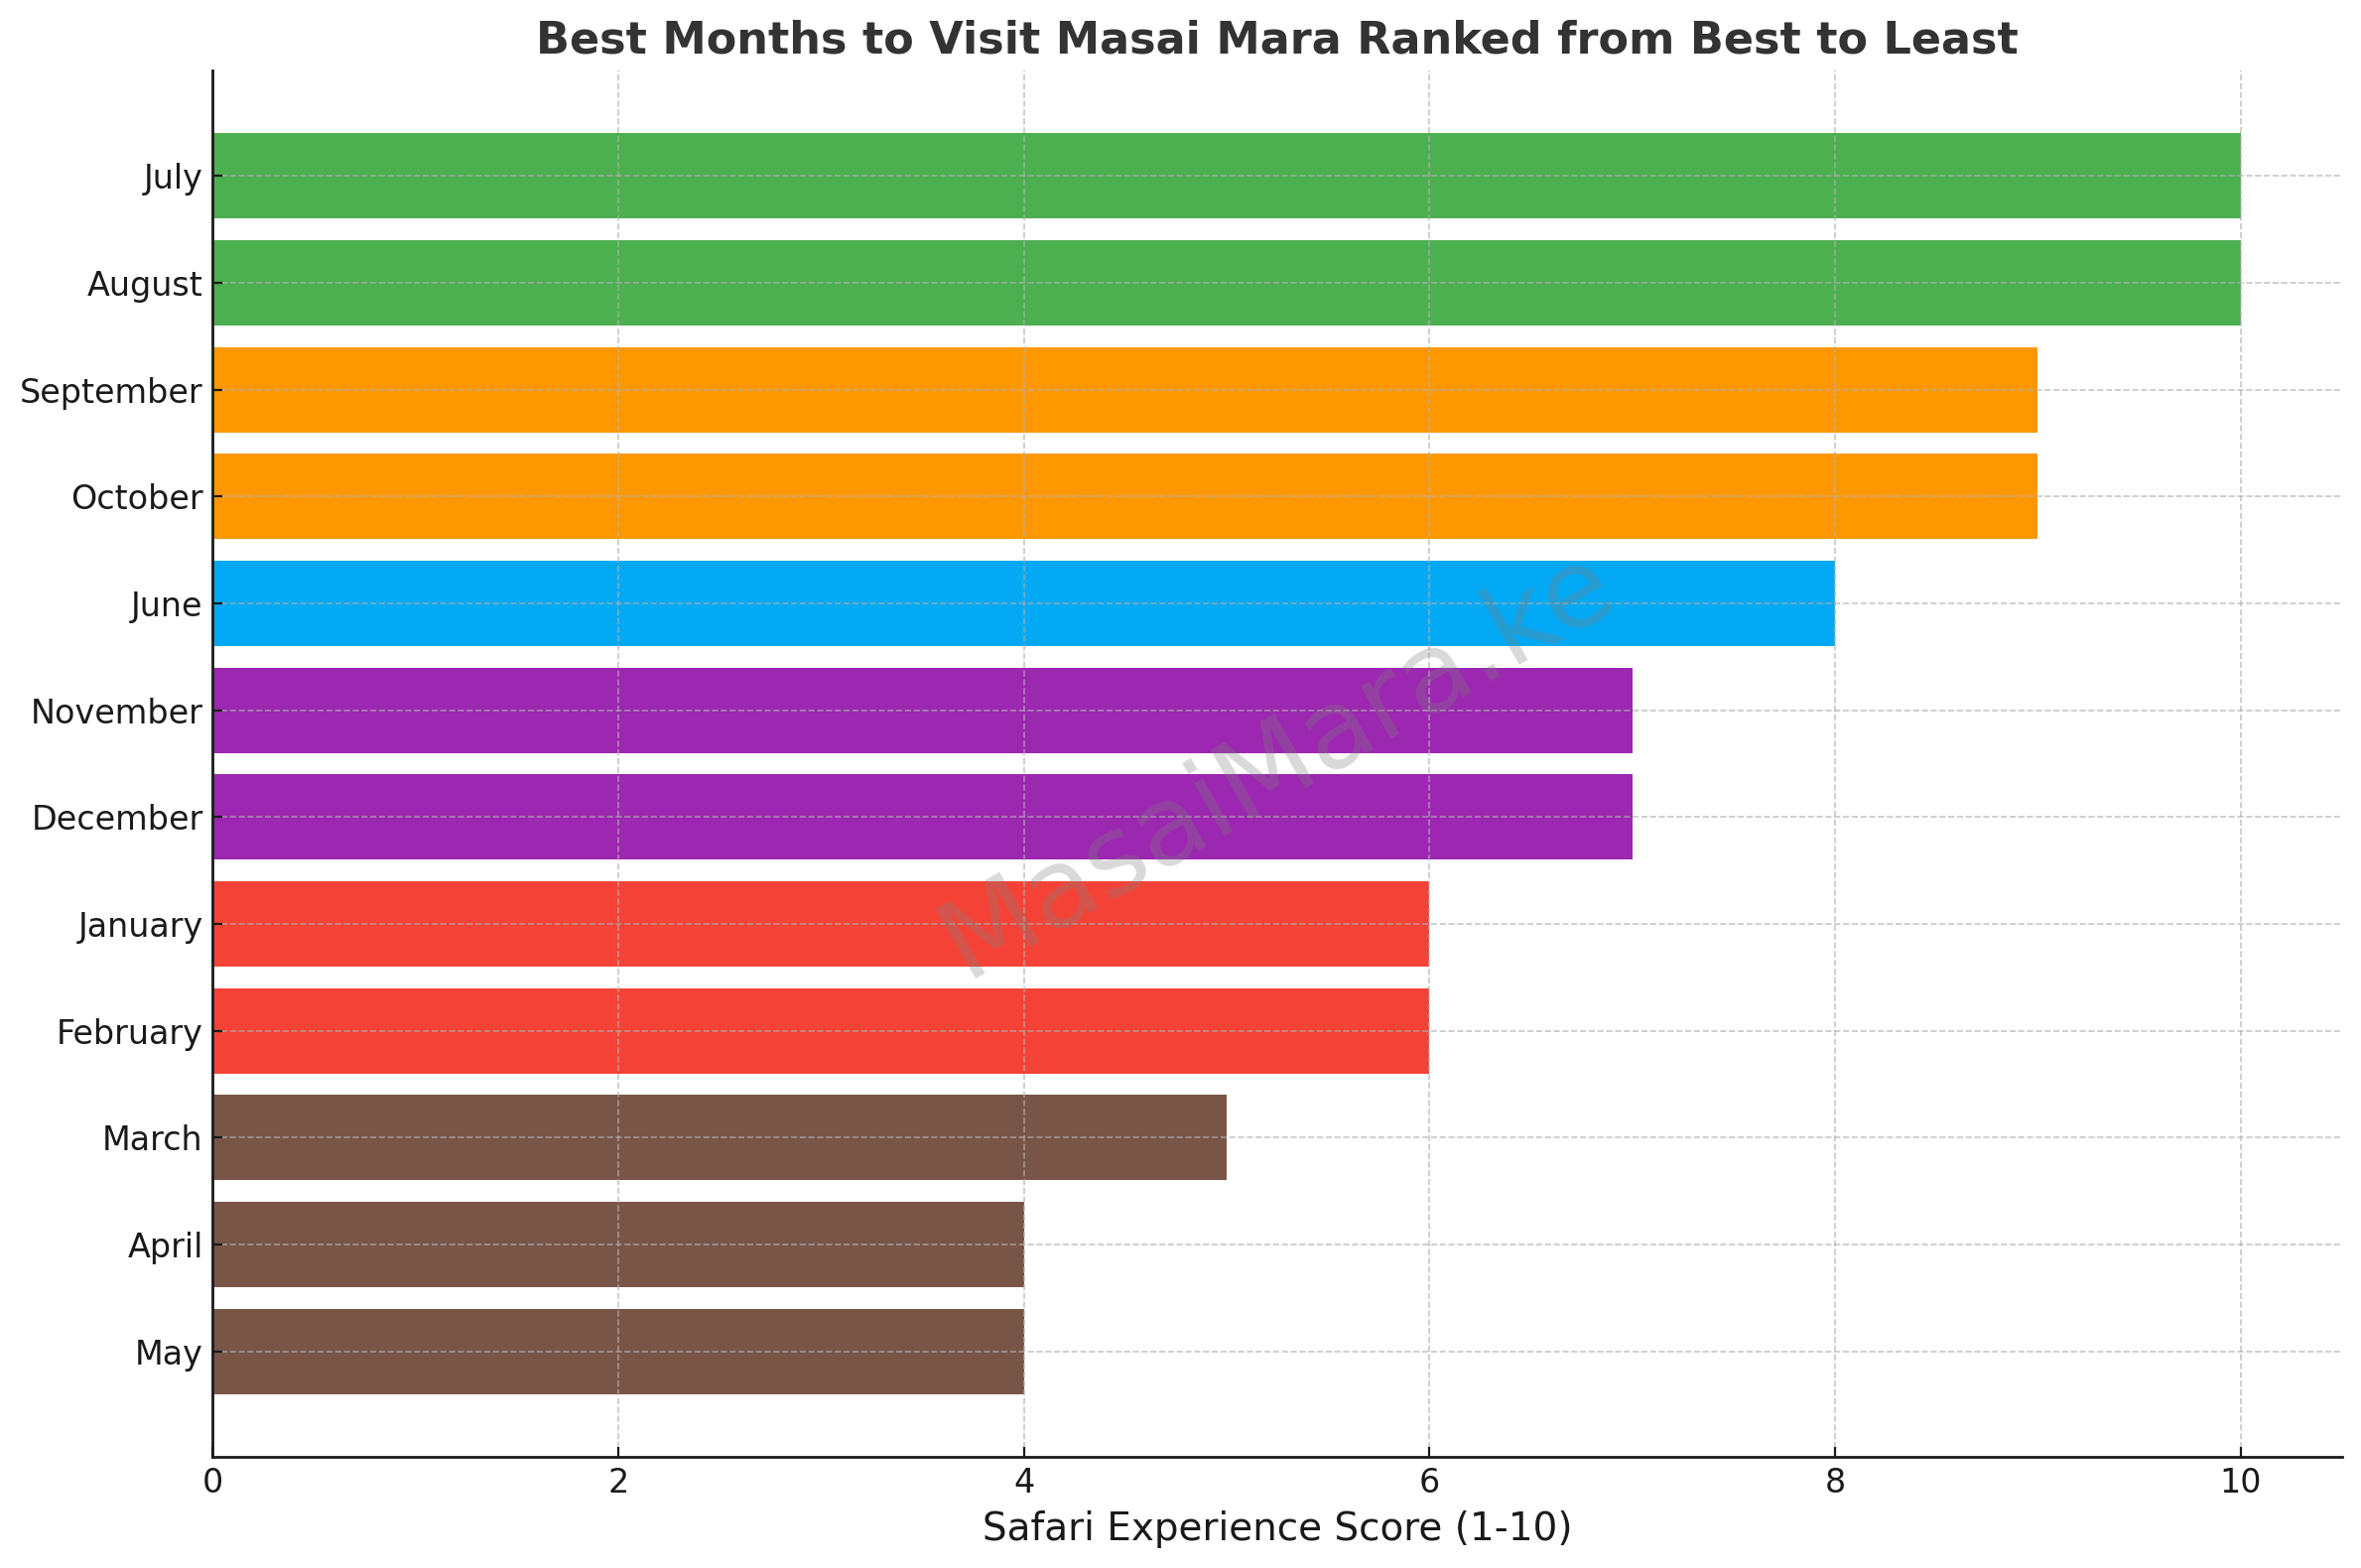
The Masai Mara is not just one vast, uniform savannah. It is a complex mosaic of sectors, zones, regions, and ecological areas—each shaped by rivers, plains, woodlands, marshes, and escarpments, and each offering a different safari experience. Understanding how the Masai Mara is divided helps you choose where to stay, where to drive, and what wildlife you are most likely to see.
This comprehensive guide explains Masai Mara sectors, zones, regions, and areas, shows how the reserve is structured on maps, and breaks down the landscape and ecological zones that define wildlife movement. Whether you are planning your first safari or refining a return trip, this is your practical reference to the geography of the Mara.
1. How the Masai Mara Is Divided: Sectors, Zones, Regions, and Areas
When people talk about the Masai Mara sectors or Masai Mara zones, they are usually referring to practical geographic subdivisions used by guides, camps, and conservation managers. These divisions are not administrative borders in the same way as counties or districts; instead, they reflect:
- Landscape structure (plains, woodlands, river systems, escarpments)
- Ecological function (grazing areas, predator territories, migration corridors, wetlands)
- Safari logistics (game drive circuits, access routes, airstrips, camp locations)
- Wildlife distribution patterns (where certain species concentrate seasonally)
In everyday safari language, you will hear interchangeable terms such as:
- Masai Mara sectors
- Masai Mara zones
- Masai Mara regions
- Masai Mara areas
- Masai Mara sections or divisions
All describe ways of breaking the reserve into manageable, meaningful parts for exploration and conservation.
2. Masai Mara Sectors Map and Zones Map: How to Read the Landscape
A Masai Mara sectors map or Masai Mara zones map typically highlights:
- The Mara River and Talek River systems
- The open plains that dominate much of the reserve
- Patches of woodland and bushland
- Marshes and seasonal wetlands
- The western escarpment and higher ground
- Key access routes, gates, and airstrips
These maps help you understand how the Masai Mara is divided and why different areas feel so different on a game drive. For example:
- River corridors act as wildlife magnets during dry periods
- Open plains are prime predator–prey hunting grounds
- Woodlands offer cover for leopards and browsing species
- Marshes provide year-round water and grazing
- Escarpments shape drainage, vegetation, and movement routes
Using a zones map is essential for planning game drive routes, choosing the best-located camps, and timing visits around seasonal wildlife movements like the Great Migration.
3. The Main Masai Mara Regions and Areas: A Practical Overview
While boundaries are fluid, most safari planning groups the reserve into broad regions that roughly correspond to:
- Central areas with dense road networks and high wildlife concentrations
- Northern areas with important river systems and dispersal zones
- Eastern areas closer to access points and community lands
- Western areas near the escarpment and the Mara Triangle side
- Southern areas connecting toward the Serengeti ecosystem
These Masai Mara regions and areas are useful for understanding:
- Where game density is typically highest
- Which areas are busier or quieter
- How long it takes to move between sections
- Where certain habitats dominate
4. Masai Mara Landscape Zones: Plains, Rivers, Woodlands, Marshes, and Escarpments
The Masai Mara landscape zones are the physical foundation of everything you see on safari. Each landscape type supports different wildlife communities and behaviors.
Open Plains Zones
The famous plains zones of the Masai Mara are wide, rolling grasslands that:
- Support large herds of wildebeest, zebra, and gazelles
- Attract lions, cheetahs, and hyenas that hunt in open terrain
- Offer classic, unobstructed safari दृश्यs and photography
- Are central to the Great Migration spectacle
River Zones
The Masai Mara river zones, especially along the Mara and Talek rivers:
- Provide permanent water in dry seasons
- Concentrate elephants, buffalo, hippos, and crocodiles
- Are famous for migration river crossings
- Support lush vegetation that draws grazers and browsers alike
Woodland Zones
The woodland zones of the Mara feature denser tree cover and shrubs:
- Offer prime habitat for leopards and other elusive species
- Support browsers such as giraffe and eland
- Provide shade and cover in hotter months
- Create more intimate, atmospheric game drive experiences
Marsh Areas
The marsh areas of the Masai Mara are wetlands fed by springs and seasonal floods:
- Act as dry-season refuges for grazing animals
- Attract birds, hippos, and water-dependent species
- Maintain green grazing when surrounding plains dry out
- Are key ecological buffers in drought cycles
Escarpment Areas
The escarpment areas along the western edge:
- Mark a dramatic change in elevation and scenery
- Influence rainfall patterns and drainage
- Provide scenic viewpoints and different vegetation types
- Form natural boundaries and wildlife movement corridors
5. Masai Mara Ecological Zones: How Habitat Shapes Wildlife
Beyond visible landscapes, the Masai Mara ecological zones describe how soil, water, vegetation, and grazing pressure interact. These ecological divisions explain why:
- Some areas support high herbivore biomass year-round
- Others are seasonal grazing grounds used mainly during rains
- Predator territories cluster where prey density is highest
- Migration routes follow nutrient-rich grass growth patterns
- Marshes and rivers act as ecological anchors in dry periods
Understanding these ecological zones helps explain why wildlife is never evenly spread and why guides plan routes differently in different seasons.
6. The Core Sectors: North, East, West, South, and Central Masai Mara
For practical safari planning, many operators describe the reserve using five broad directional sectors.
Masai Mara Central Sector
The central sector is often the busiest and most wildlife-rich area:
- Dense game drive road network
- High concentrations of predators and herbivores
- Close to major rivers and open plains
- Popular due to reliable year-round sightings
Masai Mara North Sector
The north sector includes important river systems and dispersal areas:
- Strong elephant and buffalo presence
- Mix of plains, riverine woodland, and rolling terrain
- Key movement routes for wildlife shifting with seasons
- Often slightly quieter than central areas
Masai Mara East Sector
The east sector lies closer to some main access routes and community lands:
- A blend of plains and bushland
- Good for general game viewing and shorter drives
- Important transition zone between core reserve and surrounding areas
- Often used as an entry or exit corridor for safaris
Masai Mara West Sector
The west sector is influenced by the escarpment and the Mara River system:
- More dramatic topography in places
- Key riverine habitats and crossing points
- Scenic landscapes with varied vegetation
- Strong mix of predators, grazers, and birdlife
Masai Mara South Sector
The south sector connects ecologically toward the Serengeti:
- Crucial during the Great Migration periods
- Dominated by open plains and seasonal grazing grounds
- Important movement corridor for large herds
- Best appreciated during migration months but rewarding year-round
7. Why Understanding Masai Mara Zones Matters for Your Safari
Knowing the Masai Mara sectors and zones helps you:
- Choose the right area to stay based on your interests
- Plan efficient game drive routes and reduce transit time
- Target specific wildlife experiences such as big cats or river crossings
- Balance busy versus quieter areas of the reserve
- Match your visit to seasonal wildlife movements and habitats
Two safaris in different zones of the Mara can feel like completely different destinations, even though they are within the same ecosystem.
8. Putting It All Together: From Maps to Real Safari Decisions
When you look at a Masai Mara zones map or sectors map, you are really seeing:
- A patchwork of landscapes
- A set of ecological systems interacting with rainfall and grazing
- A network of wildlife movement corridors
- And a practical framework for planning unforgettable safaris
The Masai Mara is not just about animals—it is about how space, water, grass, and terrain shape life across one of Africa’s most famous ecosystems.
Final Thoughts: Choosing Your Ideal Masai Mara Sector or Zone
There is no single “best” zone in the Masai Mara—only the best zone for your goals. Whether you prioritize:
- Big cat sightings
- Migration drama
- Scenic landscapes
- Quieter, less crowded drives
- Or varied habitats in one trip
Understanding the Masai Mara sectors, zones, regions, and ecological areas allows you to plan smarter, travel better, and experience the Mara in a deeper, more informed way.
Zone-by-zone comparison table
A) Directional sectors (most common safari planning “zones”)
| Zone/Sector | Best for | Habitat signature | Wildlife strengths | Crowd level | Best season timing | Trade-offs | Who should choose it |
|---|---|---|---|---|---|---|---|
| Central sector | Classic first-time Mara, high “all-round” game | Open plains + riverine edges + mixed scrub | Consistent predators, large herbivore densities, frequent action | Higher | Strong year-round; excellent in dry months | More vehicles at sightings; more time on “main” tracks | First-timers, short stays, people who want reliability |
| North sector | Balanced safari with slightly more breathing room | Rolling plains + river corridors + pockets of woodland | Elephants/buffalo frequent; good lion/leopard potential in riverine cover | Medium | Great in dry season when water concentrates wildlife | Some areas more spread out; sightings can be less “stacked” | Return visitors, families wanting calmer drives |
| East sector | Access-friendly drives, efficient logistics | Plains + bushland transition | General game, good grazers, solid predator chances | Medium | Good in shoulder seasons; also fine year-round | Some stretches can feel less dramatic than river-heavy zones | Short itineraries, budget/value stays, quick entry/exit |
| West sector | Scenic variety, river systems, strong photography | Escarpment influence + riverine habitat + varied vegetation | Great mixed viewing; strong birdlife; good predator–prey dynamics | Medium | Excellent in dry season; river edges productive | Terrain can slow travel; some routes are less direct | Photographers, people who like landscape variety |
| South sector | Migration-linked experiences and big open spaces | Open plains + seasonal grazing | Huge herbivore movements seasonally; predators track herds | Variable | Best aligned with migration windows and grass flush cycles | Can be quieter outside peak movement; longer transits depending on base | Migration-focused travelers, longer stays |
B) Landscape/ecological zones (habitat-based “micro-zones” that cut across sectors)
| Habitat zone | What it looks like | What it’s best for | Typical sightings | When it shines | What to watch for |
|---|---|---|---|---|---|
| River zones | Permanent water, lush banks, galleries of trees | Reliable game, classic river scenes, crossings (seasonal) | Hippo, croc, elephant, buffalo; predators patrol edges | Dry season concentration; migration crossing periods | Crowding at famous crossing points; mud after rains |
| Open plains zones | Wide visibility, short grass “runways” | Predator hunts, big herds, sunrise/sunset photography | Lion, cheetah, hyena; wildebeest, zebra, gazelles | Dry season for visibility; post-rain green flush for grazing | Wind/heat shimmer; sightings can draw multiple vehicles |
| Woodland zones | Denser cover, shade, thickets | Leopard searching, intimate drives, browsing species | Leopard potential, giraffe, eland; birds | Midday heat when animals use shade; dry season | Harder visibility; requires patient tracking |
| Marsh/wetland zones | Reeds, green swales, springs, soft ground | Drought refuge, birds, close-range grazing | Waterbirds, hippo; grazers using green forage | Dry season and late dry season especially | Access can be limited after heavy rain |
| Escarpment/high ground | Elevated viewpoints, broken terrain | Scenic panoramas, varied vegetation, dramatic light | Mixed game; good raptors; occasional big cats | Clear mornings/evenings; after rains for lush scenes | Steeper tracks; slower driving; weather shifts |
Where-to-stay guide by sector
Below is a practical “choose-your-base” guide. I’m keeping it sector-first, then calling out the best camp positioning within that sector (riverfront vs plains edge vs woodland pocket, etc.).
Central sector: best base for short, high-yield safaris
Best camp positioning
- Plains-edge camps for fast access to open hunting grounds at dawn
- River-adjacent camps for midday shade drives and consistent wildlife along water
Ideal for
- First-time visitors, 2–3 night trips, travelers who want “maximum sightings per hour”
What you’ll get
- Efficient game drives with lots of route options and backup loops if sightings shift
Trade-offs
- More vehicles around marquee sightings; choose a camp slightly off the main track if you value quiet
North sector: calmer feel with strong “big game” fundamentals
Best camp positioning
- River corridor camps (best for leopard searching, elephants, strong mixed viewing)
- Woodland pockets for shade drives and birds, plus a different texture than pure plains
Ideal for
- Families, return visitors, people who want strong sightings without the most intense crowding
What you’ll get
- Solid all-day productivity, especially in dry months when animals key into water
Trade-offs
- Wildlife can be more “distributed,” so guiding quality and patient tracking matter more
East sector: logistics-friendly and often best value
Best camp positioning
- Access-friendly bases near major approach routes for quick starts and fewer long transits
- Plains transition camps that can reach both open areas and bushy edges
Ideal for
- Budget/value seekers, tight schedules, travelers combining Mara with other parks
What you’ll get
- Efficient entry/exit, good general game, flexible routing for half-day drives
Trade-offs
- Some areas feel less “river iconic” unless you plan drives that target river zones
West sector: landscape variety and strong photography potential
Best camp positioning
- Riverfront or river-near camps for classic river scenes and consistent daytime activity
- Higher-ground viewpoints if you prioritize scenery, sunsets, and dramatic light
Ideal for
- Photographers, travelers who want “Mara + scenery,” people who enjoy varied habitats
What you’ll get
- A mix of river wildlife, plains hunts, and visually striking terrain transitions
Trade-offs
- Terrain can slow travel; pick a base that minimizes long detours to your priority habitats
South sector: migration-aligned stays and big open spaces
Best camp positioning
- Plains-focused camps placed for early access to herd routes and open visibility
- Flexible-drive bases that can pivot quickly if herds shift (migration is dynamic)
Ideal for
- Migration-focused travelers, longer stays (4+ nights), people who enjoy wide open drives
What you’ll get
- The “big herds” feeling when timing aligns, plus strong predator behavior around movement corridors
Trade-offs
- Outside peak movement windows, you may drive further to concentrate on consistent hotspots
Quick “pick your base” cheat sheet
- Want the most reliable 2–3 night safari? → Central sector, plains-edge or river-adjacent
- Want strong wildlife with a calmer pace? → North sector, river corridor base
- Want value + easy logistics? → East sector, access-friendly base
- Want scenery + photography variety? → West sector, river-near or higher-ground base
- Chasing migration dynamics? → South sector, plains-focused base with flexible routing
Masai Mara Driving Map Guide
A driving map focuses on road and track networks by zone:
- All-season tracks vs. seasonally muddy roads that become difficult during rains
- Routes linking airstrips like Keekorok, Musiara, and Mara North with safari camps
- Recommended circuits for morning, afternoon, or full-day drives
- Indication of priority areas during migration (e.g., Mara River crossing points)
This is the most useful map for game drives and planning efficient wildlife drives that minimize long transits.
Using GPS in Masai Mara Zones
GPS (Global Positioning System) aids navigation in more remote parts of the ecosystem:
- Tracks receivers and waypoints relative to latitude/longitude across the reserve
- Helps confirm track names, gate positions, and airstrip locations
- Especially useful for self-drive safaris where printed maps are not enough
- GPS coordinates can be matched with offline maps for accuracy
Most camps and lodges will provide coordinates for pickup points and routes to follow, which is essential when venturing into conservancies where signage may be minimal.
Masai Mara Road Network by Zone
The road network map displays all internal tracks and how they relate to zones:
- Major corridors connecting Talek Gate, Sekenani Gate, and Sand River Gate
- Track loops ideal for morning vs. evening drives
- Temporary closures and seasonal diversions
- Connections to conservancy routes and off-reserve circuits
Understanding this network helps you choose the right base camp so that wildlife hotspots are accessible without spending too much drive time reaching them.
Masai Mara Gate Map by Zone
A gate map shows each entry point relative to zones and travel routes:
- Talek Gate for access to central and eastern zones
- Sekenani Gate as a gateway to eastern plains
- Sand River Gate for southern plains and migration routes
- Ololaimutiek Gate for western access including parts of the Mara Triangle
Gate locations are key to choosing starting points for game drives and estimating travel distances to camps and wildlife areas.
Masai Mara Airstrip Map by Zone
An airstrip map identifies the domestic airfields scattered across the reserve and adjacent areas:
- Mara North airstrip serving the northern plains
- Musiara airstrip for central-northern access
- Keekorok airstrip near central-eastern zones
- Other small airstrips that connect camps and reduce road transit time
These airstrips are used by charter flights from Nairobi’s Wilson Airport, optimizing safari logistics.
Masai Mara River Map by Zone
A river map focuses on the Mara River, Talek River, Sand River, and tributaries:
- Major river crossings such as Mara Bridge
- Seasonal water levels and typical crossing points
- How river corridors serve as animal highways during dry seasons
Rivers are central to navigation because they define natural barriers and habitat zones that influence both wildlife and driving routes.
Wildlife by Zone in the Masai Mara: Where to See the Big Five and Key Species by Location
The Masai Mara is not one uniform wilderness. Wildlife concentrates around specific places—river bends, marshes, plains, ridges, and access corridors. Knowing exact locations like Talek Gate, Mara Bridge, Paradise Plains, Musiara Marsh, Lookout Hill, and the Mara Triangle can dramatically improve your chances of seeing the species you care about most.
This guide explains where to look, and why, using real safari landmarks and ecological logic.
Best Zones for the Big Five in Masai Mara
If your goal is to see lion, leopard, elephant, buffalo, and rhino, focus on areas where rivers, plains, and woodland intersect.
Top Big Five areas:
- Musiara Marsh and Rhino Ridge area (north-central): Strong for lion, elephant, buffalo, and occasional rhino
- Talek River corridor near Talek Gate: Excellent for elephant, buffalo, lion, and leopard
- Mara River zone around Mara Bridge and the Mara Triangle: Reliable for elephant, buffalo, lion, leopard, plus hippo and crocodile
- Paradise Plains and central plains: Great for lion, buffalo, and big herds that attract predators
Why these work: Big Five species overlap most where there is permanent water, high prey density, and mixed cover—exactly what these locations provide.
Lion Territories by Location
Lions follow prey concentration and open hunting terrain.
Best lion areas:
- Paradise Plains and central plains: Classic lion hunting grounds with high wildebeest and zebra density
- Musiara Marsh area: Famous for resident prides that hunt along marsh edges
- Talek River valley near Talek Gate: Strong for prides that patrol riverine prey routes
- Mara Triangle grasslands west of Mara Bridge: Excellent lion density with big herds in season
Why here: Lions prefer open plains for hunting but anchor territories near reliable water and prey corridors.
Where to See Cheetahs in Masai Mara
Cheetahs need visibility and space.
Best cheetah locations:
- Paradise Plains and the wider central plains
- Southern plains toward the Serengeti border
- Open grasslands east of the Mara River and around Lookout Hill
Why here: These areas have short grass, gentle slopes, and long sightlines, ideal for high-speed chases and scanning for prey.
Leopard Hotspots in the Masai Mara
Leopards require trees, cover, and ambush structure.
Top leopard areas:
- Talek River forests near Talek Gate
- Mara River banks around Mara Bridge
- Wooded zones near Musiara Marsh
- Riverine woodland in the Mara Triangle
Why here: These zones provide large trees for resting and caching kills and dense cover for ambush hunting.
Elephant Zones of the Masai Mara
Elephants track water and mixed feeding habitats.
Best elephant areas:
- Talek River corridor
- Mara River zone near Mara Bridge and downstream into the Mara Triangle
- Marsh systems around Musiara Marsh
- Northern dispersal areas near Rhino Ridge
Seasonal note: In dry months, elephants cluster along rivers and marshes; in wet months, they spread into plains and woodlands.
Buffalo Areas in the Masai Mara
Buffalo need grass and water in large quantities.
Best buffalo locations:
- Musiara Marsh and surrounding floodplains
- Talek River grasslands
- Mara River floodplain, especially in the Mara Triangle
- Central plains near permanent water points
Buffalo often form huge herds in these areas, which in turn attract lions and hyenas.
Rhino Zones in the Masai Mara
Rhinos are range-restricted and heavily protected.
Best rhino areas:
- Rhino Ridge area and adjacent protected sectors
- Northern central Mara zones with controlled access
Important reality: Rhino sightings depend on targeting specific, monitored areas with knowledgeable guides rather than general roaming.
Wildebeest Migration Zones Explained
The Great Migration reshapes the Mara’s wildlife map.
Key wildebeest zones by phase:
- Southern plains and Paradise Plains during arrival and early movement
- Central plains and Talek River approaches during peak grazing spread
- Mara River crossings near Mara Bridge and downstream in the Mara Triangle during crossing season
- Northern dispersal areas toward Rhino Ridge after crossings
These movements also drive predator concentrations and scavenger activity.
Zebra Migration Areas in the Mara
Zebra usually lead or accompany the wildebeest.
Best zebra areas:
- Paradise Plains and central plains
- Southern grasslands toward the Serengeti boundary
- Post-rain grazing areas east of the Mara River
Zebra often appear first, followed closely by wildebeest and then predators.
Hippo River Zones in Masai Mara
Hippos are tied to deep, permanent pools.
Best hippo locations:
- Mara River around Mara Bridge
- Deep bends of the Talek River
- River pools in the Mara Triangle
These sites offer predictable, year-round hippo sightings.
Crocodile Hotspots in the Masai Mara
Nile crocodiles dominate major river systems.
Top crocodile areas:
- Mara River near Mara Bridge
- Downstream crossing points in the Mara Triangle
- Deep, slow-flowing sections of the Talek River
Migration season dramatically increases visibility and feeding activity.
Best Birding Zones in the Masai Mara
Birdlife follows water, woodland, and open plains.
Top birding locations:
- Musiara Marsh and other wetlands for waterbirds
- Talek and Mara River woodlands for forest-edge and riverine species
- Open plains around Paradise Plains for raptors and ground birds
- Escarpment and Lookout Hill area for raptors and scenic species
Vulture Feeding Areas in the Mara
Vultures concentrate where kills and carcasses are frequent.
Best vulture zones:
- Central plains around Paradise Plains
- Migration corridors near Mara River crossing points
- Predator-rich areas of the Mara Triangle
Large gatherings often signal nearby predator activity.
Hyena Territories Across the Mara
Hyenas are everywhere there is prey and predators.
Strong hyena areas:
- Central plains and Paradise Plains
- Talek River corridor
- Musiara Marsh region
- Mara Triangle grasslands
They are especially dense in migration-influenced zones.
Giraffe Areas in the Masai Mara
Giraffes follow trees, not grass.
Best giraffe locations:
- Talek River woodlands
- Riverine forest along the Mara River
- Bushland and woodland edges near Musiara and Rhino Ridge
Topi Habitat Zones in the Mara
Topi prefer short-grass plains.
Best topi areas:
- Central plains near Paradise Plains
- Southern open grasslands
- Seasonally productive plains away from thick bush
They are often seen in distinct clusters in high-quality grazing patches.
Eland Areas in the Masai Mara
Eland prefer quieter, mixed habitats.
Best eland locations:
- Woodland–plains transition zones north of central Mara
- Less disturbed areas near Rhino Ridge and northern dispersal zones
They are wider-ranging and less predictable than many antelope.
Hartebeest Zones in the Mara
Hartebeest are open-country grazers.
Best hartebeest areas:
- Open plains around Paradise Plains
- Drier grassland zones toward the eastern side of the reserve
Ostrich Areas in the Masai Mara
Ostriches prefer visibility and space.
Best ostrich locations:
- Open plains near Paradise Plains and central Mara
- Southern grasslands with low bush cover
Wildlife Density by Location in Masai Mara
Highest density areas (season-dependent):
- Mara River and Talek River corridors in dry season
- Musiara Marsh during dry months
- Paradise Plains and central plains during migration grazing phases
- Mara Triangle during river crossing periods
Lower density areas:
- Far from water in late dry season
- Heavily wooded or low-productivity grassland patches
- Transitional zones outside main migration routes
Final Safari Planning Insight
If you want to consistently see more wildlife, base your planning around real places, not just directions:
- Big cats: Paradise Plains, Musiara Marsh, Talek River
- Leopards: Talek River forests, Mara River near Mara Bridge
- Elephants and buffalo: Mara River, Talek River, Musiara Marsh
- Migration drama: Mara Bridge, Mara Triangle, southern plains
- Birdlife and wetlands: Musiara Marsh and river systems
Masai Mara by Season, Zone, and Use: An Expert Planning Summary
1) Seasons & Timing: How the Mara Changes by Zone
Best season by zone
- River zones (Mara & Talek): Best in the dry season when wildlife concentrates at water and crossings occur.
- Open plains (central/south): Excellent in migration and dry months for predators and big herds; lush but more dispersed in the green season.
- Woodland & marsh zones (Musiara, marsh systems): Strong in late dry season as refuges; productive year-round but access varies in rains.
Dry vs green season
- Dry season: Highest wildlife density near rivers, marshes, and core plains; best for predators and visibility.
- Green (rainy) season: Fewer crowds, dramatic scenery, superb birding, but wildlife is more spread out and some tracks become slow or impassable.
Migration & calving
- Migration zones: Southern and central plains on arrival, Mara River / Mara Triangle during crossings, northern dispersal areas after.
- Calving periods: Plains and productive grazing zones where fresh grass emerges; predators follow closely.
Access, floods, and roads
- Flood risk: River floodplains, marsh edges, and low-lying tracks in heavy rains.
- Road conditions: Best in dry months; slower and more selective routing needed in rains.
- Water availability: Drives wildlife toward rivers and marshes in dry season; spreads them in wet season.
Crowds & peak/low season
- Peak season: River zones, Mara Triangle, central plains during migration months.
- Low season: Peripheral plains and woodland zones—quieter, greener, excellent for photography and birding.
Photography & birding
- Photography: Dry season for dust-free action and river drama; green season for color, skies, and newborns.
- Birding: Best in wet/green seasons, especially wetlands, rivers, and marshes.
Key drivers of wildlife movement
- Rainfall → grass growth → herbivore movement → predator concentration.
- Rivers and marshes anchor dry-season distribution; plains dominate in migration phases.
2) Conservancies & Boundaries: How Space Is Managed
Main reserve vs conservancies
- The main reserve is open-access, busier, and fee-based per day.
- Conservancies (Mara North, Naboisho, Ol Kinyei, Lemek, Olare Motorogi, Ol Choro Oiroua, Pardamat, Siana) are community or private, with lower vehicle density, stricter rules, and night drives/walking in many cases.
Mara Triangle
- Western sector, separate management, strong river systems, excellent scenery, and often better-controlled traffic at crossings.
Boundaries, buffer zones, and corridors
- Buffer zones reduce pressure on core habitats.
- Wildlife corridors connect reserve and conservancies, enabling seasonal movement.
- Grazing and land use vary: core conservation, community grazing, tourism zones.
Rules, access, and fees
- Each zone (reserve vs conservancy) has different access rules, activities, and fee structures.
- Conservancy fees typically replace or add to reserve fees but buy you exclusivity and flexibility.
3) Logistics & Access: How You Actually Move Around
Gates by zone
- Talek & Sekenani: Central/eastern access
- Sand River: Southern plains & migration routes
- Ololaimutiek: Western approaches and Triangle access
Airstrips
- Scattered across zones (e.g., Musiara, Keekorok, Mara North, Triangle side), used to minimize long road transfers.
Travel time & distances
- Movement between zones can take 1–3+ hours depending on tracks, season, and traffic.
- Base camp location matters more than map distance.
Road network & fuel
- Mostly dirt tracks; conditions vary sharply by season.
- Fuel and services are limited—planning loops and return routes is essential.
Self-drive vs guided
- Guided safaris are optimal in core and complex zones (rivers, marshes, predator areas).
- Self-drive is feasible on main routes but requires GPS, maps, and strong navigation discipline.
Rules, speed limits, ranger posts
- Speed limits, off-road restrictions, picnic and camping sites, and ranger posts differ by zone—critical for safety and compliance.
Accessibility
- Some zones are easier for seniors or short stays (central/eastern); rougher, slower terrain dominates marshes and escarpment-influenced areas.
4) Photography & Filming: Matching Zones to Images
Best photography zones
- River zones & Mara Triangle: Crossings, reflections, drama
- Central & southern plains: Big cats, hunts, open-light action
- Woodlands & marsh edges: Leopards, birds, intimate scenes
Time of day
- Sunrise: Open plains, river bends
- Sunset: Escarpment edges, plains with horizon lines
- Low light: Riverine forests and marsh margins
Special interests
- Bird photography: Marshes, rivers, wetlands (best in green season)
- Landscape: Western high ground, river corridors, wide plains
- Action shots: Migration corridors and predator-rich plains
Practicalities
- Vehicle positioning matters more in busy zones; quieter conservancies allow better angles.
- Drones and filming permits are tightly regulated and zone-dependent.
- Hides (where permitted) are usually in conservancies or special-use areas.
5) Costs & Planning: Turning Zones into a Budget and Itinerary
Fees by zone
- Reserve fees: Per day, fixed by authority.
- Conservancy fees: Often higher, but include exclusivity, activities, and lower vehicle density.
Value vs luxury
- Best value zones: Eastern/central reserve areas with good access and moderate fees.
- Luxury/exclusive zones: Mara Triangle and top conservancies like Olare Motorogi or Naboisho.
Budgeting logic
- Cost is driven by where you sleep, not just where you drive.
- Time spent transiting between zones = hidden cost in fuel and lost game-viewing hours.
Itinerary design
- Short trips: One well-chosen base zone beats chasing the whole map.
- Longer trips: Combine zones (e.g., central plains + Mara Triangle, or reserve + conservancy).
Nights per zone
- 2–3 nights minimum per base to avoid “drive-through” safaris.
Who should go where
- Families/first-timers: Central or eastern zones, easy access, reliable game.
- Honeymoon/luxury: Conservancies or Triangle for privacy and scenery.
- Solo/photographers: Zones with flexibility, fewer vehicles, and varied habitats.
Practical planning
- Packing, tipping, insurance, and vehicle choice all depend on season, terrain, and remoteness of your chosen zones.
The Core Expert Takeaway
In the Masai Mara, season + habitat + management zone matter more than compass direction.
- Dry season = rivers and marshes
- Migration = plains and crossing corridors
- Green season = birds, scenery, and quieter zones
- Conservancies = quality and exclusivity
- Central reserve = density and efficiency
Smart safari planning is not about seeing “everything,” but about choosing the right zones at the right time and building your itinerary, budget, and expectations around that reality.